3.3. Proprietary Layers
In previous sections, we displayed layers based on a standards compliant WMS and a custom tile cache. Online mapping (or at least the tiled map client) was largely popularized by the availability of proprietary map tile services. OpenLayers provides layer types that work with these proprietary services through their APIs.
In this section, we’ll build on the example developed in the previous section by adding a layer using tiles from Bing, and we’ll toss in a layer switcher so you can decide which layers you want visible.
3.3.1. Bing!
Let’s add a Bing layer.
Tasks
In your
map.htmlfile, find where the OSM layer is added in the map initialization code. Below themap.addLayer(osm);line, add the following:var bing = new OpenLayers.Layer.Bing({ key: "AqTGBsziZHIJYYxgivLBf0hVdrAk9mWO5cQcb8Yux8sW5M8c8opEC2lZqKR1ZZXf", type: "Road", }); map.addLayer(bing);
Warning
The Bing tiles API requires that you register for an API key to use with your mapping application. The example here uses an API key that you should not use in production. To use the Bing layer in production, register for an API key at https://www.bingmapsportal.com/.
Now that we have more than one layer in our map, it is time to add a layer switcher that controls layer visibility. Somewhere in your map initialization code (below the part where we create the
map), include the following to create a layer switcher and add it to the map:map.addControl(new OpenLayers.Control.LayerSwitcher());
Save your changes and reload
map.htmlin your browser: http://localhost:8082/ol_workshop/map.htmlOpen the Layer Switcher at the upper right-hand corner of the map view, and select “Bing Roads”.
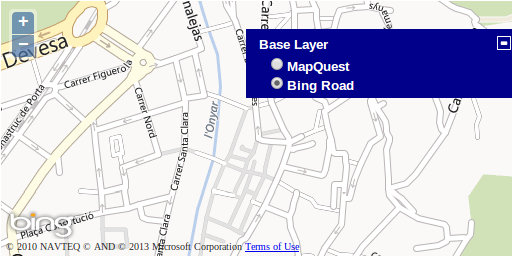
A map with a bing layer and OpenStreetMap tiles.
3.3.1.1. Complete Working Example
Your revised map.html (without the bonus exercise from the previous section) file should look something like this:
<!DOCTYPE html>
<html>
<head>
<title>My Map</title>
<link rel="stylesheet" href="openlayers/theme/default/style.css" type="text/css">
<style>
#map-id {
width: 512px;
height: 256px;
}
.olControlAttribution {
font-size: 10px;
bottom: 5px;
left: 5px;
}
</style>
<script src="openlayers/lib/OpenLayers.js"></script>
</head>
<body>
<h1>My Map</h1>
<div id="map-id"></div>
<script>
var center = new OpenLayers.LonLat(-93.27, 44.98).transform(
'EPSG:4326', 'EPSG:3857'
);
var map = new OpenLayers.Map("map-id", {projection: 'EPSG:3857'});
var osm = new OpenLayers.Layer.OSM();
map.addLayer(osm);
var bing = new OpenLayers.Layer.Bing({
    key: "AqTGBsziZHIJYYxgivLBf0hVdrAk9mWO5cQcb8Yux8sW5M8c8opEC2lZqKR1ZZXf",
    type: "Road",
});
map.addLayer(bing);
map.addControl(new OpenLayers.Control.LayerSwitcher());
map.setCenter(center, 9);
</script>
</body>
</html>
Next we’ll move on from raster layers and begin working with vector layers.